Posted on Leave a comment

Measuring Marble vs Metal Deities: Why 12 Inches Isn’t Always 12 Inches

When it comes to measuring marble vs metal deities for new Shringar, many devotees are surprised to find that ’12 inches’ doesn’t always mean the same thing! To get the perfect fit, we first calculate the total height. We measure from the base to the top of the hair bun.For Gaura Nitai, we measure to the tips of Their outstretched fingers.

However, the material of the form is the most important factor. Measuring a metal deity requires a completely different approach than measuring marble. (We will stick to these two for now. I don’t yet have enough experience with wooden forms to offer advice there!)

The Biggest Challenge when Measuring Marble vs Metal Deities

There are a few marked differences between these materials. When I receive deity garment requests, I always ask for photos first. This helps me determine if the form is marble or metal. Height is the first major difference.

A metal deity has a large, heavy base. This base is usually about a quarter of the overall height. It is required for the stability of the metal form. In contrast, a marble deity rarely has a base more than 1 inch thick. A thicker marble base would place too much weight strain on the form. This could cause the marble to break.

Understanding the Proportions

Let’s look at a 12-inch Krishna form. A marble Krishna will be mostly body height, minus just 1 inch for the base. However, a 12-inch metal Krishna is often a 9-inch body on a 3-inch base.

This affects every measurement. It changes the leg length, the waist, and even the head circumference. Even so, “deity walas” still call the metal form a “12-inch deity.” This leads to miscommunications. Sometimes a pujari might not count the base at all.

The Visual Difference

To help you visualize this, I’ve put together an illustration. You’ll see that while both Krishnas are technically “12 inches tall,” the one on the left has much more “body” to dress than the one on the right!

Measuring Marble vs Metal Deitie Size guide to the height differences of a metal and marble murti both 12inches comparing the bases and overall features
Measuring Marble vs Metal Deitie

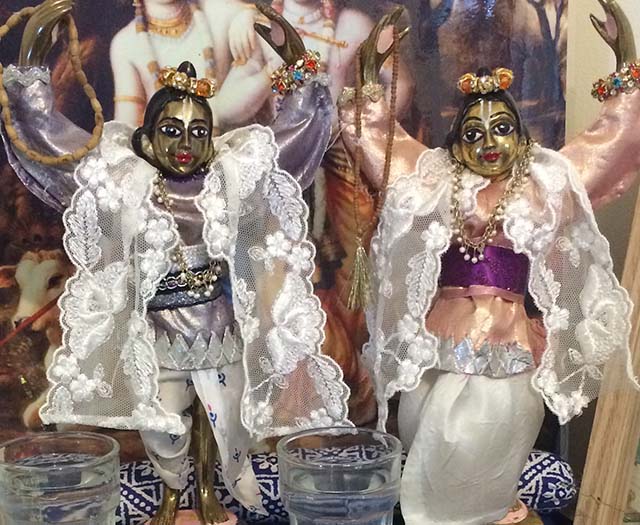
When we work out the height for Gaura Nitai, we calculate from the bottom of the base to the tips of Their outstretched fingers. Just like with Krishna, we have to consider if They are made from metal or marble because it changes the body proportions completely.

Measuring Gaura Nitai: Metal vs Marble

When we work out the height for Gaura Nitai, we measure to the tips of Their outstretched fingers. Just like with Krishna, we must consider the material. It changes the body proportions completely.

In a 12-inch set of Gaura Nitai, much of that height is the space between Their heads and fingertips. If They are metal, They have a large, heavy base. This leaves very little room for the actual body. A 12-inch metal Gaura Nitai might only have a 6 or 7-inch torso to dress.

If They are marble, the base is only about 1 inch. This means the body is much longer, even though the total height is still 12 inches.

Why Precision Matters

This is why I can’t use “total height” alone to make Their clothes. If I made a shirt based only on the 12-inch measurement, it would be way too big for Their actual torso. This affects the dhoti length, the shirt size, and where the waist falls. When you send me photos for Gaura Nitai, it is very helpful to show the measurement of the “Body Height” (from the base to the shoulder) separately from the “Total Height” (to the fingertips).

I’ve had many conversations with pujaris who don’t count the base in their measurements, which can lead to a Shringar that doesn’t sit quite right. This is exactly why, when you message me, the first thing I’ll ask for is a photo. Seeing His form helps me immediately identify if He is metal or marble and the pose the form is in, so I can adjust my patterns accordingly.

Whether the material is metal, marble or other, He deserves a fit that allows Him to stand comfortably and elegantly. Next time you measure your Lord, keep the base in mind—it’s the secret to a perfect fit.

Looking for more guidance on your Deity journey? If you haven’t brought your Lord home yet and are still deciding which material is right for your seva, you might find my post on [Choosing Between Metal and Marble Deities: A Devotee’s Guide] helpful. It covers everything from the daily care routines to the unique “mood” each material brings to the altar.

Stay Connected: For more Shringar inspiration and behind-the-scenes looks at my studio, [subscribe to my YouTube channel]

Posted on Leave a comment

Easiest dhoti in the world for Krishna deity

Following on from my first HOW TO MAKE A DHOTI FOR KRISHNA post, I have put together a very simple guide, with some ideas and explanations about the reasons for pleating, and how and where to pleat.

This really is the worlds easiest dhoti… or maybe I should say, realistic dhoti, after all there are some dhoti which are just a sarong and that is probably easier style.

It’s also extra fun because I have temporarily in my custody this beautiful Krishna deity I painted! Isn’t He lovely? Syamasundar Krishna in all joyous happy beauty. (If you are painting deities then please check out my tips on painting deity forms)

As long as you know how to sew and hem a simple rectangle, then this DIY tutorial is all you need to get started on making your own clothes for Krsna! If you have your deity standing in front of you then you can easily work out the length you need to cut.

I love it if I have Krsna in front of me it makes sewing for Him SO much easier! In general I would allow 1/2 of waist width for the front pleats, 3cm extra for the back pleat, and then 1.5 times waist width for the length to pass between Krishna legs and fold into the back of his dhoti at the back.

Always sew on your braid before you do your final stitches to secure the ends and add your press studs!

If anything in this tutorial is unclear, please refer to my step-by-step tutorial which is detailed with images! Here’s that link again 

There’s a whole catalogue of Krishna videos on my YouTube channel which you may or may not follow – not everything makes it’s way to my blog, we’ve diversified across social media platforms, hah! Please subscribe and follow me on YouTube & Facebook! I promise to keep it Krishna conscious! I don’t promise not to totally obsess over art, Krishna, deities, and more 🙂


Posted on Leave a comment

Gopal Bhatta Goswami & Sri Radha Raman

Here’s a brief synopsis of Gopal Bhatta Goswami (1503-1578) and the appearance of Radha Raman deity.

vishnu form of ranganath deity
Ranganath has a history stretching back to Lord Brahma!

Sri Chaitanya Mahaprabhu began His walking journey throughout Southern India in the summer of 1510. After many days He came to a small city called Shri Rangam. The main temple here is the largest Vishnu temple in all of India and pilgrims come from 100’s of miles to see the Deity, Ranganatha.

Ranganatha is a deity of Vishnu, lying on his side on Seisha Naga. Before entering the temple of Ranganath first one visits Ranganaiki, Lakshmi, and take her permission to visit the inner chamber of her husband. In the courtyard of the temple there is a huge deity of Garuda, the bird carrier of Vishnu, just waiting should Lord Vishnu wish to travel anywhere.

Here Lord Chaitanya met Vyenkata Bhatta and his 2 brothers. They were brahmans looking after the Deity. Vyenkata’s 7 year old son was Gopal Bhatta.

Lord Chaitanya appears in a dream to Gopal Bhatta
Lord Chaitanya appeared in a dream to Gopal Bhatta and revealed Himself as non-different than Krishna

Lord Chaitanya stayed for 4 months of the rainy season and using logical and scriptural foundations, He enduced Vyenkata to worship Krsna. Meanwhile Lord Chaitanya had been allowing young Gopal Bhatta to serve Him the whole time He was there.

When it was time for Lord Chaitanya to leave, Vyenkata Bhatta fainted out of separation and young Gopal cried with tears of love. Just to pacify them Lord Chaitanya agreed to stay a few more days.

During this time Gopal Bhatta had a dream of Lord Chaitanya. He appeared to Gopal Bhatta as Krsna and then transformed Himself back into His form as Sri Chaitanya.

In this dream Gopal Bhatta was instructed by Lord Chaitanya You will meet 2 jewel-like persons, Rupa and Sanatan. I have given them my mentality in order to publish my teachings. But by your own disciple, especially, these teachings will spread to every town and village.

Upon awakening, Gopal Bhatta went directly to Lord Chaitanya to serve Him. Lord Chaitanya instructed him For now, stay here and serve your mother and father. After they have departed this world you may go to Vrindavan and join Rupa and Sanatan. Always engage yourself in hearing and chanting the glories of Krsna. 

When he grew up Gopal Bhatta accepted his uncle Prabodhananda as his spiritual master. He studied scripture and became renowned throught the lands as a great scholar. Eventually after the death of his parents, Gopal Bhatta proceeded to Vrindavan where he was greeted with great love by Srila Rupa Goswami and Srila Sanatan Goswami.

On hearing of his arrival in Vrindavan Lord Chaitanya sent a letter to Rupa and Sanatan. Along with this letter He sent a package for Gopal Bhatta which included His loincloth and other personal articles. One item in particular, a small black wooden seat, used by Lord Chaitanya Himself, is still worshiped in a temple in Vrindavan.

Upon the arrival of the letter all the devotees became ecstatic and started chanting the holy Names of God. Gopal Bhatta was deeply grateful that Sri Chaitanya had sent His cloth and he treasured the sacred paraphernalia for the remaining years of his life.

Live his life as an embodiment of the scriptures, Gopal Bhatta’s fame spread through all of India and he became known as the younger brother of Rupa and Sanatan.

Once he travelled by foot to the Gandaki River in Nepal, a long and arduous journey. There he found 12 shilas (sacred stones) and brought them back to Vrndavan.

worshipping krsna many forms Gopal Bhatta goswami vaishnava
Gopal Bhata Goswami worships Damodar Shila

Upon arriving back in Vrndavan, he felt unqualified to worship his sacred stones, so he again journed back to Nepal to replace them in the Gandaki River. While chanting he carefully placed the shilas in the holy river. But they spontaneously jumped back into his hands. Trying 3 or 4 times to leave them in the river he found he was unable to do so. He took them back to Vrndavan to worship. He carried them at all times in a cloth bag that hung from his neck.

8 years after Lord Chaitanya’s disappearance, Gopal Bhatta felt the need to worship a Deity. This was intensified after a wealthy merchant gave him jewellery and find cloth for the worship of Krsna.

Damodar Krishna Radha Raman deity
The Damodar Shila of Gopal Bhatta had self-manifested as Radha Raman deity of Krishna playing flute as a sweet young boy

Gopal Bhatta placed these items before his shilas and fervently prayed for proper direction. The next morning he found that one of the shilas known as the Damodar shila had transformed into a Deity of Krsna. Gopal Bhatta fell to the ground immediately and offered beautiful prayers.

hearing of this miraculous event, Rupa Goswami, Sanatan Goswami and many other Vaisnavas hurried to the spot. They were there when Gopal Bhatta named the Deity Shri Radha Raman.


Accreditation given where known, but as so often the case amongst Vaishnava devotees, one does not always know the name of artist or photographer, apologies for any offense caused.

Posted on Leave a comment

Easy vest DIY tutorial for Nitai Gaur or Krishna deities

gauranitai murti diy tutorial deity clothes

Summer is so easy! Just lovely breezy dhoti & nice light shawls. Once winter rolls around I start wishing I had more shirts for my dear Lords, so I have come up with a really simple shirt option.

This set is basically a sleeveless vest option and there are a variety of fabrics you can experiment with.

For this tutorial I used quite a flexible but heavy thai shot silk fabric (given to me by a very dear friend, thank you!).

I have also made longer looser versions in a sheer fabric which look really lovely on, they work really well and nicely, almost like flowy shawls.

The beauty of this pattern is it’s ease. It suits a beginner skill level, and there are no tricky sleeve insets in sight!

DIY sewing deity tutorial
after measuring the shoulder to waist height of your deities, double it so that each fabric strip will fold tidily over each shoulder. Hem both all the way around as needed.

How to make murti clothes for Nitai Gaur shirts
Once you have hemmed each strip of fabric, create pleats in the centre so that the neckline is narrower. Stitch across your pleats to secure them in place.

Deity garment tutorial
Now leaving enough room for the arm to pass through the hole and the top to sit around the shoulder, carefully overlap the fabric and stitch down, securing each strip of fabric into a half of the top

Deity Clothes DIY top tutorial for SEVA Vaishnava devotees of Krishna
Inside out, note the seams and stitching so you can understand how to do it.

Deity Murti top tutorial for sewing for your deities
Turn the tops in the right way and test on your deities. These little sleeveless vests can be pulled together tightly for warmth, and belted, or they can be left open and flowing.
The thai silk I have used for this set actually sits really nicely and is moldable, but I have also made versions where I have put velcro at the back so it closes securely.

gauranitai murti diy tutorial deity clothes
The finished garment set with little tunic tops


For more DIY deity tutorials browse through these posts.

I posted this set off, so couldn’t share a photo of them on.

This was the first type of top I made for my own deities, and it really is the foundation of long sleeve top patterns I will plan to share later on.

Try it in light fabrics! Add braid, add trims, have fun, and share your pics I would LOVE to see your creativity.


Be sure to let me know if my tutorial is lacking, I might have to work on improving it. Hopefully you’ll get the idea of how to construct these easy deity vests.


Posted on 2 Comments

10 Easy Deity Jewelry Cheats

Krishna Crown easy stretchy bangle

Some jewellery ideas you can buy ready made and use or adapt to ornament your sweet Lords.

There are lots of differently sized deities, my Lord Chaitanya & Lord Nityananda deities are a glorious 53cm base to tip of arms, and I admit I was eager for this size, after years of making fiddly garments for my parents Gaura Nitai deities, who are only around 20cm.

  1. Elasticated rings for bracelets
  2. Stick on bindi earrings – if your deities do not have pierced earholes
  3. Earrings with the plastic earring holder as the stud back are perfect for your deities
  4. Bracelets as crowns – two types which work, stretchy elastic or soft friendship band style bracelets
  5. Ornamental braid crowns (small DIY required in joining the ends together, can be done with a stitch or two, or even sticky tape!)
  6. Bracelets & Anklets necklaces – small fine chains work nicely for this, check the kids section
  7. Adjustable Rings as crowns – particularly lovely around a bun, or for Radha deity
  8. Clippon earrings are darling to adorn belts, ends of shawls or fix turbans in place
  9. Buy beads by the strand & simply tie the ends of the thread – instant deity necklace
  10. Ribbon can make easy shawls – Lace works particularly nicely & rarely needs hem

bracelets as necklaces, a selection of our faves

Necklaces – fancy ornamental style – you can buy these filigree style necklaces anywhere, perfect for deities necklaces

Expandable rings perfect bangles for deities

soft plastic backs make perfect earring backs for studs

mukut deity jewellery
Anklebells/ Anklets as necklaces or belts

Elastic bracelets as crowns

Clippon earrings can be used charmingly attached to turbans, headbands or belts

Buy beads by the open strand and tie the ends for an instant necklace our favorite pearl necklaces are a simple pre-threaded strand of tiny pearls

Bindi for earrings, rings, jewellery, toe rings are so pretty and easy

Krishna Crown easy stretchy bangle
Krsna wears a soft tied cowherd-boy style bandanna, and using a stretchy bangle to ornament the shawl which is tied with ends out, cowherd boy style. Easy to find these stretchy bracelets at big cheap jewellery places like Lovisa, Dotti, and so on. He wears amber earrings which are secured using the little plastic stud backs which are easy to mold up to the backs of his ears.

Krishna & Balaram easy Deity DIY NO SEW no Crafting ornamental accessories
Smaller 9″ Krishna & Balaram deities wear charming strawberry earrings (childrens section of jewellery store) & little bracelets as necklaces. The gold one Lord Balaram wears is a bracelet, as is the silver diamonte one Krsna wears.
The extra pearl and silver one draped over Lord Balaram is another special delicate bracelet. These are my 8yr olds play deities. I try and let her develop her bond with them whilst only gently guiding!

Lace Shawls deity DIY, and ring crowns.

Krishna deity crown easy DIY tutorial tips and tricks for ornaments and accessories
Krishna’s crown is made from a braided/beaded wristband, with a little tassel attached. He also wears an anklet as a belt. His earrings are amber & his necklace is vintage Indian murti jewellery.